Hi guys, this tutorial will help you to root your OnePlus Nord 3 using the Magisk 26.1 app.
Compatible models are OnePlus Nord 3 CPH2491.
OnePlus Nord 3 Specs
Released on July 11th 2023 the OnePlus Nord 3 comes with a 6.74 inches Fluid AMOLED touchscreen display having 1B colors 120Hz refresh rate HDR10+ and 1450 nits peak brightness. The Nord 3 comes with Android 13, OxygenOS 13.1.
Memory and Storage options: 128GB 8GB RAM, 256GB 16GB RAM
Colors: Misty Green, Tempest Gray
What is rooting?
Rooting is a hack that’s done on your OnePlus Nord 3 which will enable us to gain true administrator/super user privileges. With root access you will be able to edit even the system protected files.
Pros
- Complete access
- Can install root apps
- Will be able to access system files
Cons
- Chance of bricking your device
- Will be vulnerable to attacks
Prerequisites
Please make sure that you have already done the below things before starting the rooting procedure.
- Charge your battery at least to 80%
- Unlock the bootloader
To unlock the bootloader you may have to enable the USB Debugging and OEM Unlocking.
Enabling Developer mode
For that first you need to enable the “Developer Mode” on your OnePlus Nord 3. For that please go to Settings-> About Phone -> Tap on Build Number 7 times ->. Now please go to the Settings main menu and go to System -> Advanced -> Developer Options. Here you will be able to find USB Debugging and OEM Unlocking. Please enable them.
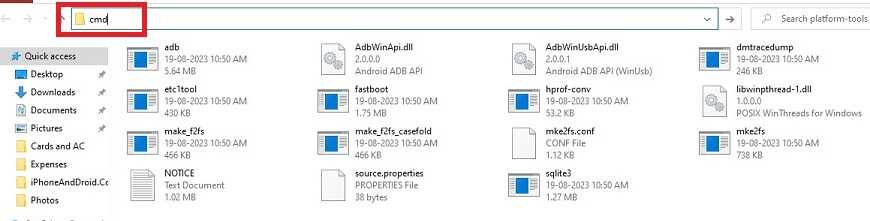
Now you need to download the Android Platform tools from this link.
Once downloaded please extract it to your PC. Now connect your OnePlus Nord 3 using the USB data cable to your PC. When done go to the already extracted “Platform tools” folder and type “CMD” in the address bar and tap the enter key.
Command prompt commands
Now the command prompt will open. Here type and enter;
adb reboot bootloader
To verify the successful connection type in the below command and enter;
fastboot devices
Please check if your device is there in the list. If not please install the fastboot drivers for your OnePlus Nord 3.
Now you need to unlock the bootloader of your OnePlus Nord 3. For that please type in the following command in the CMD.
fastboot flashing unlock
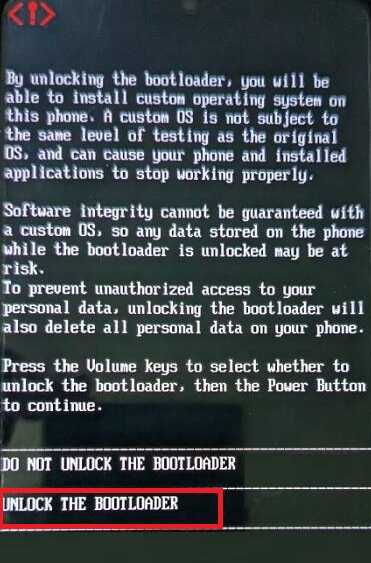
Once done you will get a similar warning message on your OnePlus Nord 3. Select “Unlock The Bootloader” using the volume keys and use the “Power Key” to execute the action.
Please note that this will erase all the data on your phone
Now your device will undergo a factory reset and you have to do all the steps you did when you initially setup your phone.
Once done please download the firmware for your OnePlus Nord 3. For that please follow the below links. However kindly make sure that you have downloaded the exact same version of the firmware which is currently installed on your OnePlus Nord 3. You may use alternate download links if your current version is not listed here.
- CPH2491export_11_A.09_2023062022110000 (Global, India)
- CPH2491export_11_A.06_2023051211370000 (Global, India)
- CPH2493GDPR_11_A.08_2023060922480116 (Europe)
- CPH2493GDPR_11_A.06_2023051211360116 (Europe)
Once downloaded please extract the firmware to your PC desktop. Open the extracted folder and go to the “IMAGES” folder.

Here find the “boot.img” file and copy it to the your phones root folder.
Now the actual rooting steps starts. First step is to patch the “boot.img” file using the Magisk app.
Steps to root OnePlus Nord 3 using Magisk
1. For that first please download and install the Magisk app on your OnePlus Nord 3 using the below link.
3. Once installed please open “Magisk” app.
Please refer the below app screenshot for more easier understanding. In the Magisk app tap on “Install” near to “Magisk“and in the next page tap on “Select and Patch a File“. When asked to select please select the previously copied “boot.img” file in the platform folder. Once selected tap on “LET’S GO” to start the patching process.

4. Now copy the patched “boot.img” file back to your “platform-tools” folder. You may also need to change the file name to “boot.img” if it’s different.
5. Once done, restart your OnePlus Nord 3 to fast boot mode. Now connect your phone to your PC using the USB data cable.
6. Now open Windows Powershell/Command Prompt from the platform folder;
In the command prompt window type in the command “fastboot flash boot boot.img” and press enter to execute the command. Once you get the “Finished” message from the command prompt you are good to go.
Now restart your OnePlus Nord 3 using the below command;
fastboot reboot
and wait for the device to boot up. That’s it guys your phone is currently rooted with super user privileges. You may cross check root by using any root checker app from Play Store.
Normal queries for Root OnePlus Nord 3
- Root OnePlus Nord 3 using Magisk 26.1
- OnePlus Nord 3 root latest 2023 method
- OnePlus Nord 3 Custom ROM install
If “How To Root OnePlus Nord 3 Using Magisk?” tutorial really helped you, please give a like/share on social networking websites.