
This tutorial will guide you in detail to take a screenshot/screen print of your iPhone‘s active screen. Even though this is a very simple trick most of the average Smartphone users doesn’t know how to do that. Never mind because we have got you covered and will guide you through the whole process which will enable you to do the same.
Now lets proceed to the actual steps to take a Screenshot/Screen Print on your Apple iPhone.
Method – 1
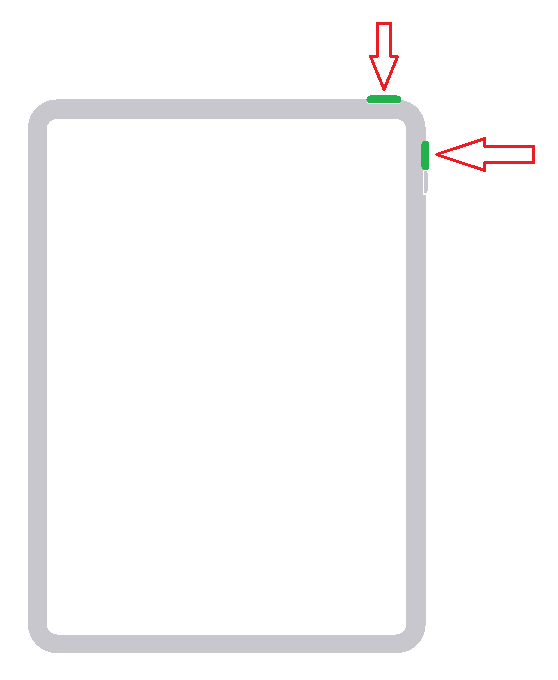
How To Take A Screenshot/Screen Print On Apple iPhone New Models (iPhone 13, iPhone 12, iPhone 11 etc)
This will cover the method to do the same for the latest iPhone models like Apple iPhone 13 Pro Max, Apple iPhone 13 Pro, Apple iPhone 13, Apple iPhone 13 mini, Apple iPhone 12 Pro Max, Apple iPhone 12 Pro, Apple iPhone 12, Apple iPhone 12 mini, Apple iPhone SE (2020), Apple iPhone 11 Pro Max, Apple iPhone 11 Pro, Apple iPhone 11, Apple iPhone XS Max, Apple iPhone XS, Apple iPhone XR etc.
1. To take the screenshot first go the screen for which you want to have a screen captured on your iPhone.
2. Now press the “Side Button” + “Vol Up” button at the same time and release both at the same time to take a screenshot of the current screen. You will get a quick flash on the screen which will confirm the screen has been captured.
The screenshot will be automatically saved in the “Photos”. You may edit the image as you wish.
Method – 2
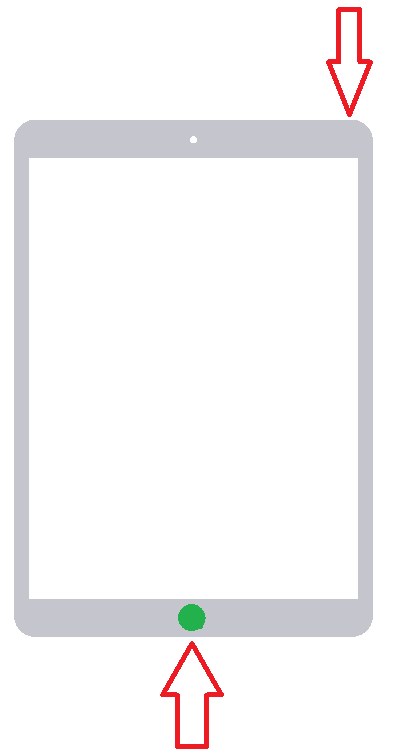
How To Take A Screenshot/Screen Print On Apple iPad
This will cover all the Apple iPad models like Apple iPad mini (2021), Apple iPad 10.2 (2021), Apple iPad Pro 12.9 (2021), Apple iPad Pro 11 (2021), Apple iPad Air (2020), Apple iPad 10.2 (2020), Apple iPad Pro 12.9 (2020), Apple iPad Pro 11 (2020), Apple iPad 10.2 (2019), Apple iPad Air (2019), Apple iPad mini (2019), Apple iPad Pro 12.9 (2018), Apple iPad Pro 11 (2018), Apple iPad 9.7 (2018), Apple iPad Pro 12.9 (2017), Apple iPad Pro 10.5 (2017), Apple iPad 9.7 (2017), Apple iPad Pro 9.7 (2016), Apple iPad Pro 12.9 (2015), Apple iPad mini 4 (2015), Apple iPad Air 2, Apple iPad mini 3, Apple iPad Air, Apple iPad mini 2, Apple iPad mini Wi-Fi, Apple iPad mini Wi-Fi + Cellular, Apple iPad 4 Wi-Fi, Apple iPad 4 Wi-Fi + Cellular, Apple iPad 3 Wi-Fi + Cellular, Apple iPad 3 Wi-Fi, Apple iPad 2 Wi-Fi + 3G, Apple iPad 2 Wi-Fi, Apple iPad 2 CDMA, Apple iPad Wi-Fi + 3G, Apple iPad Wi-Fi etc.
a. Without Home Button
This is for the newer version iPads which doesn’t have a “Home” button like the new iPhones.
1. To take the screenshot first go the screen for which you want to have a screen captured on your iPad.
2. Now press the “Top Button” + “Vol Up” button at the same time and release both at the same time to take a screenshot of the current screen. You will get a quick flash on the screen which will confirm the screen has been captured.
The screenshot will be automatically saved in the “Photos“. You may edit the image as you wish.
b. With Home Button
This is for the older version iPads which does have a “Home” button.
1. To take the screenshot first go the screen for which you want to have a screen captured on your iPad.
2. Now press the “Top Button” + “Home” button at the same time and release both at the same time to take a screenshot of the current screen. You will get a quick flash on the screen which will confirm the screen has been captured.
The screenshot will be automatically saved in the “Photos“. You may edit the image as you wish.
Method – 3
How To Take A Screenshot/Screen Print On Apple iPhone Older Models (iPhone 8, iPhone 7, iPhone 6 etc)
This is for the older version iPhones which does have a “Home” button.
This will cover older version iPhones like Apple iPhone 8, Apple iPhone 8 Plus, iPhone 7 Plus, Apple iPhone 7, Apple iPhone SE, Apple iPhone 6s Plus, Apple iPhone 6s, Apple iPhone 6 Plus, Apple iPhone 6, Apple iPhone 5s, Apple iPhone 5c, Apple iPhone 5, Apple iPhone 4s, Apple iPhone 4, Apple iPhone 4 CDMA, Apple iPhone 3GS, Apple iPhone 3G, Apple iPhone etc.
1. To take the screenshot first go the screen for which you want to have a screen captured on your iPhone.
2. Now press the “Side Button” + “Home” button at the same time and release both at the same time to take a screenshot of the current screen. You will get a quick flash on the screen which will confirm the screen has been captured.
The screenshot will be automatically saved in the “Photos”. You may edit the image as you wish.
If you have faced any issues while trying the above steps, please don’t hesitate, feel free to post it in the comment section below, don’t worry I will take a look at it asap.
If “How To Take Screenshot on All Apple iPhones (iPhone 13, 12,11 & Older Models)” tutorial really helped you, please give a like/share on social networking websites by using the below given buttons.